r/3Dprinting • • 20h ago

Troubleshooting Stringing in every terrain crack

Thumbnail
gallery
4 Upvotes

I’m printing terrain for miniature war games. Using a Bambu A1 with Bambu PLA. I’ve been using a dehydrator to get down to 30 or below humidity.

Are there other settings I can optimize to stop the stringing under every little nook and crack? (see photos).

I’m new to this and having a blast. Thanks for any advice!

Edit: Model is by Diceverse on MMF - it’s one of their Ruined City House Sets.

Here are my Bambu Studio Settings:

Bambu Studio settings — Bambu Lab A1

PRINTER
- Printer: Bambu Lab A1 / Nozzle: 0.4mm, Flow: Standard
- Build plate: Textured PEI

PROJECT FILAMENTS
- 1: Bambu PLA Basic | 2: Generic PLA | 3: ABS | 4: ASA

PROFILE: 0.16mm Optimal @BBL A1 (modified)

QUALITY
- Layer height: 0.16mm / Initial layer: 0.2mm
- Seam position: Aligned
- Only one wall on top surfaces: Top surfaces
- Only one wall on first layer: off

STRENGTH
- Wall loops: 2 (Alternate extra wall: off)
- Top: Monotonic pattern, 6 layers, 1mm thick
- Bottom: Monotonic pattern, 4 layers, 0mm thick
- Internal solid infill: Rectilinear
- Sparse infill: 15%, Grid pattern

SPEED
- Slow down for overhangs: ON
60mm/s @ 10% | 30 @ 25% | 10 @ 50% | 10 @ 75% | 10 @ 100%
- Slow down by height: off
- Bridge: 50mm/s / Gap infill: 300mm/s
- Outer wall: 200mm/s / Inner wall: 300mm/s
- Sparse infill: 330mm/s / Internal solid infill: 300mm/s
- Travel: 700mm/s

SUPPORT (I didn’t use supports on the bricks, because it’s covered in bricks)
- Enabled / Type: tree (manual) / Threshold angle: 25°
- On build plate only: off
- Support speed: 150mm/s / Interface: 80mm/s

COOLING (Bambu PLA Basic @BBL A1)
- Part fan: 60% min (80s layers) -> 80% max (6s layers)
- Keep fan always on: on
- Slow down for better layer cooling: on
- Force cooling for overhangs and bridges: ON
- Aux fan: ramps to 70%

RETRACTION (filament overrides)
- Length / Z-hop: N/A (printer-managed)
- Long retraction on cut (experimental): on, 18mm

OTHERS
- Brim: Auto, 5mm / Fuzzy skin: off
- Purge into support: on (single filament, no purging occurring)


r/3Dprinting • • 22h ago

Free Model I got tired of looking up the same conversions, so I printed them

Post image
0 Upvotes

I'm a mechanical engineering student and I keep Googling the same formulas: RPM to rad/s, degrees to radians. So I made two small plates with the formula on both directions and stuck them next to my monitor.

Printed on a Bambu A1 in PLA, 30 minutes each, no supports. The text is raised so it stays readable at an angle.

I'm thinking of making a small series for other things I always forget. What formulas would you want on your desk?

Models are on my MakerWorld profile if anyone wants them: https://makerworld.com/@EngineerDutchie


r/3Dprinting • • 48m ago

Question Snap cap inserts

Post image
• Upvotes

Has anyone else tried these snap cap inserts?

My local Scheels was sold out of 9mm soooo of course I had to go the next best route and print some inserts to throw into some spent shell casings


r/3Dprinting • • 21h ago

Question Need help with supports messing up the print

Thumbnail
gallery
4 Upvotes

I am new to 3d printing and just bought my first printer second hand, I tried to print it Vertically and horizontally, but both mess up the print. The one on the left is not fully rounded, and the one on the right has the bottom messed up.

I also tried following this video: Cura Supports for Beginners: Tutorial & Recommend Settings! - YouTube but that did not fix it.

I am using a ender 3 v2 neo, with Creality Hyper gold pla.
Hot end is set to 200 and bed at 60, speed is 50, using UltiMaker Cura.


r/3Dprinting • • 7h ago

Paid Model The Coffee Shop- Miniture Storage Container

Thumbnail
gallery
37 Upvotes

This is my miniature coffee shop container to add a little spice to your decor! :)

You can store almost anything in it, coffee beans, coffee capsules, or anything else that fits.

It comes with a few different printing options and lettering choices.

It’s designed with both multicolor and single-color printers in mind.

I’ve made it with a removable storage insert for easy cleaning and replacement.

BE AWARE!
If you’re using it for unpackaged food, such as loose coffee beans, extra precautions are needed.
Food-safe filament alone doesn’t guarantee a food-safe print. The printing process must also be suitable for food contact.
The storage insert should be cleaned regularly and replaced periodically, as residue and bacteria can build up over time.
A certified food-safe liner is the safer option for direct food contact.

Sealed or packaged food, such as coffee capsules, can be stored without the storage insert using normal filament, as long as the food remains protected by its packaging.

Now, this is a promotion for my model, and I do hope I’ve managed to get some of you interested! You can find my print on Printables.

My profile/coffee shop print:
https://www.printables.com/model/1880390-the-coffee-shop-miniture-storage-container


r/3Dprinting • • 17h ago

Discussion To good to be true

Thumbnail
gallery
9 Upvotes

I’m looking into out growing my A1 and this brand popped up on my Instagram ads. It’s claiming a 300 mm build , eight tool heads in a lot more other stuff for 500. I reserved one for 5 bucks but what do yall think.


r/3Dprinting • • 6h ago

Paid Model Custom 3d model: first customer order🥳

Post image
79 Upvotes

r/3Dprinting • • 22h ago

Troubleshooting What is causing this scarring? Elegoo Saturn 2

Post image
1 Upvotes

r/3Dprinting • • 17h ago

Discussion Is this normal for 3D prints?

Thumbnail
gallery
0 Upvotes

Recently received this grip case on Etsy for my ayn Thor bc it looked similar to my skull-n-co grip case I bought for my switch lite, costed about $12 USD.

This might be me nitpicking here but for $34 USD I thought the product would be more "polished" instead, I saw that there are lots of noticeable jagged and sharp edges.

Idk much about 3d prints but I thought people usually sand those stuff down to make it look nicer and I also noticed small divots, where I think padding was supposed to be.

I'm honestly considering returning this grip case and don't get me wrong it feels sturdy but if I have to sand down all the edges that bother me, then don't think it was worth the wait.

I could be wrong and would like to know your opinions, before I message the seller.


r/3Dprinting • • 12h ago

Project Does anyone take commissions?

Post image
0 Upvotes

Hi everyone, apologies if this isn’t allowed here, mods please delete if not.
I’m wondering if anyone in UK takes commissions? I am after a couple of parts for a diesel heater on my overlanding rig. I can do pictures, with measurements, but cant do whatever file it needs as I have no idea how to do it!
What I am after is a wall plate with 60mm input on the back, a quarter twist thread on the front to attach another pipe to and a 60mm outlet with the other part of the thread.
As it’s for a diesel heater it obviously needs to handle high temps, 120-150c from what I’ve read.
It seems that no one makes this but I want one and my brother wants one too!
Just thought, a cap that can be added to the wall plate would be good too.
Thanks for reading!


r/3Dprinting • • 17h ago

Solved Cheap electric toothbrush great for cleaning and ..

Post image
0 Upvotes

Hello. Look time lurker and sponge as I learn a great deal by reading great advice. But now I finally have something to hopefully contribute?

I found that using a cheap ultrasonic toothbrush works great on cleaning off the debris after sanding a print. Works great to remove tiny clingy plastics that gets embedded in files, hands and tools.

Give it a try! I bought mine off of amzn for like $5 on sale.

Another use is creating a tiny sanding tool by replacing the brush with a tip where you can use a double sided tape a small piece of sandpaper to get into tight spaces .

Hoping this can help someone.


r/3Dprinting • • 7h ago

Project Oops, Filament chicken...

Post image
0 Upvotes

I started this print from the other room not realizing how big it was actually going to be. Do I want a Milky crate this big? Actually, yes. Can I buy one the same size in a store? Not that I've found in the same quality. They have similar things in a few places but they are shitty quality and not square. 150% instead of 200% *might* have served my purposes. I'm not sure yet. I kind of want a bunch of these things to organize my desk so I'm probably going to print sets of 2 in various sizes.

Printed with supports because of the increased handle bridging in the larger model. The smaller model requires no supports.

In any case, wish me luck on my red filament chicken. I've ordered a brand new roll of black filament to make a matching black one so I'm not playing filament chicken again :)


r/3Dprinting • • 3h ago

Question Best filament?

0 Upvotes

Pla, bambu xc1
Bargain, for fun prints
I used the amazon basics, and it kept getting stuck. What would be the best, polymaker? Something else?


r/3Dprinting • • 9h ago

Question I need help to 3d print a figure.

Thumbnail
gallery
0 Upvotes

Hello, I've never done any 3d printing or modeling so I'm completely new to this. I like anime and I like collecting figures but the only figure from a character I like is 500-1500 euros so I wanna 3d print the character myself.

I made this stuff with VRoid studio and downloaded something off if Booth to get the clothes, the sword I downloaded off of some random website too. I downloaded my VRoid character and put it inside blender and idk what to do now. My local library has a 3d printer but idk what model or what they use and stuff. It costs 10cents per gram so I wanna use as little gram as possible

He is around 17cm and his sword is 10.4cm. I still need to pose him and make a stand but idk how to do that, I know he's kinda ugly and inaccurate too lol. The 2 photos are him with his color to give you an idea but I know the 3d printer won't print with color so I gotta paint that. The last picture is who he is supposed to be, idk to get his sword good in his hands and idk to make his cape..

Hopefully this is the right subreddit, I will really appreciate help. every tiktok I watched they put the anime character into AI website to make a model. I don't wanna do that so I used VRoid


r/3Dprinting • • 16h ago

Question First the PEI plate, now the magnetic bed

Enable HLS to view with audio, or disable this notification

0 Upvotes

I want to kill myself

2 weeks with my first printer and I made a huge damage on my PEI plate (rookie mistake, I was cleaning Z sensor and requested the printer to calibrate while the nozzle was touching the plate).

As I’m broke I just flipped the plate thinking I was a genius . Until today that i noticed the damaged plate was damaging the magnetic pad that stays down the plate.

I don’t think the damage was enough so I should be fine… but is this magnetic sheet an easy fix in case i ever need it? Lol


r/3Dprinting • • 6h ago

Troubleshooting Help with missing parts of first layer.

Post image
1 Upvotes

Hello - I'm fairly new to 3D printing and I'm working on adding an SVG to a deck box I'm working on. I added this SVG to the bottom of the model in Bambu studio as a modifier and did a test print. It looks good besides the missing segments.

I'm trying to figure out if I can get this to work. Is it the lines of the SVG text are too thin to print this way or settings I should try adjusting. I appreciate any help.

Printing on a Bambu H2D with 0.4 nozzle and working in Bambu Studio.


r/3Dprinting • • 3h ago

Project Need some advice on this print

Thumbnail
gallery
1 Upvotes

I'm designing a trolley for a SUP and could use some advice on print settings and structural strength.

At 50% infill, the print uses around 850g of filament and takes roughly 24 hours. I'm using Gyroid infill.

I have no idea how much I could safely reduce the infill without compromising the strength too much, or whether lowering it would even save a meaningful amount of filament and print time.

The trolley will be used to transport a SUP, so it needs to withstand the weight and the forces from rolling over uneven ground. I'm not sure how much infill is actually necessary for this kind of application.

Would something like 20–30% Gyroid be enough, assuming I use enough walls/perimeters, or would you stick with 50%? Any advice on how to optimize the print for strength while reducing filament usage and print time would be appreciated.

For reference, I've attached a photo of the actual wheel I'm using and a pretty crappy AI-generated image of what the assembled trolley should look like. The AI image is just to illustrate the general concept, not the exact design.

(The arms have a width of about 10mm)


r/3Dprinting • • 21h ago

Project Finally finished my Star Wars Republic Commando bust! Forgot to post this when I completed it.

Thumbnail
gallery
1 Upvotes

r/3Dprinting • • 13h ago

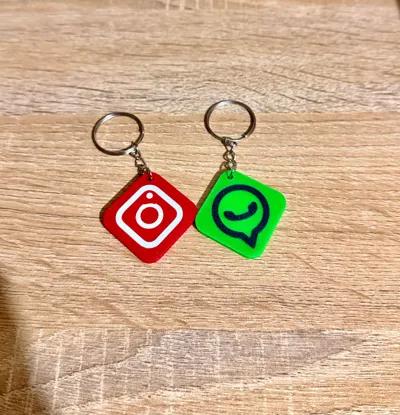
Project I made a free browser generator for two-part NFC keychains with a social icon inlaid on the front

Post image
1 Upvotes

I've been building a small set of free, browser-based generators for personalized prints. The newest one makes social media NFC keychains.

What it makes

  • A square keychain in two halves. Each half prints face down, so both outside faces get the plate texture.
  • A round pocket between the halves for an NFC tag (25 mm × 1 mm by default; size is adjustable).
  • Pins in three corners that line the halves up; the fourth corner is the key ring hole.
  • The icon is inlaid flush into the front face as a second color (works with an AMS/MMU or a filament swap).
  • Or turn off the split for a plain one-piece icon keychain.

Icons

  • Presets for Instagram, TikTok, Facebook, YouTube, WhatsApp, Telegram, Spotify, GitHub, Reddit and more.
  • Search box for other brands (uses the Simple Icons library).
  • Upload your own SVG. White areas get cut out of the icon, and strokes become solid lines.

It exports a 3MF with both halves already laid out face down, or a separate STL for each part. Everything runs in the browser, and it's free with no sign-up: https://kady3dprinting.com/designer/nfc-keychain/

To assemble: print both halves, drop the tag in, press the halves together (a drop of glue keeps them shut), then program the tag with any NFC app.

Feedback is welcome, especially on pin fit and pocket clearance with different printers and filaments. There's a "Report a Bug" button on the page.


r/3Dprinting • • 11h ago

Question New kids turbo

1 Upvotes

Heeft er iemand toevallig al eens een ontwerp gemaakt van de personages uit de film new kids turbo?


r/3Dprinting • • 14h ago

Question What settings do I use for PEY Starry sky pattern plate

Thumbnail
gallery
0 Upvotes

I know this plate is probably already cooked. But I want to figure out what’s going on before I get a be one. I tried changing the plate type in elegoo slicer to smooth plate high temp (what Google said to do because the box came with no directions, instructions, or recommend setting of any kind. I also but the starting z position to .05mm which seemed to help some. It started printing yellow then as it moved to the right side of the plate it started scratching again. Also I’m guessing I’m going to need a new nozzle head at this point ?

Centauri carbon 2 combo printer


r/3Dprinting • • 5h ago

Paid Model I made some Anatomical Models made for Educational purposes and Display Model in Hospital and Clinics

Thumbnail
gallery
16 Upvotes

I designed and 3D printed these anatomical models myself using Blender. I have small 3D printing studio

These were made for clients who needed physical models for teaching and demonstration. I worked on the models from the 3D design stage through printing and finishing.

I've been experimenting with different anatomical models, including:

• Heart

• Brain

• Kidney cross-sections

• Pelvis

• Lumbar spine (LST) models

• Blood vessel / clot models

• Patient-specific anatomical models from DICOM data

• Bird and animal anatomy

• Microscopic / educational models

The models shown here are around 175 mm and 245 mm, but I can produce them at different scales depending on the intended use.

I'm particularly interested in making models that are useful for medical education, anatomy teaching and demonstrations rather than just decorative prints.

I'm still a small home-based 3D printing business, so I'm trying to learn what medical students, educators and professionals actually find useful.

If there's an anatomical model you've wanted to have as a physical 3D print but couldn't find, I'd genuinely be interested to hear what it is.

I also take custom model requests, along with bulk orders.

Website: pegasusprintsbharat.com

Get a 10% off using this code at checkout

XW9E06VFJN6D


r/3Dprinting • • 6h ago

Question Grundplatten für Klebebeschlag Goodsmith und ähnliche Systeme selber drucken Als absoluter Anfänger machbar?

0 Upvotes

Hallo zusammen,

​ich bin ein Pferdemädchen und was das Thema 3D Druck angeht ein absoluter Neuanfänger... 😬 Ich habe gerade ein bisschen mit ChatGPT hin und her gefachsimpelt über die Idee, ob man sowas für Pferde selber machen kann, und möchte jetzt aber unbedingt mal eine Einschätzung von richtigen Menschen aus der Praxis haben.

​Es geht um Kunststoff Klebebeschläge wie zum Beispiel das System von Goodsmith oder ähnliche Anbieter. Ich habe eine schweres Kaltblut mit sondermaßen und müsste bei solchen anbietern spezial anfertigen lassen. Mein Plan wäre, die Klebelaschen und den Spezialkleber ganz normal fertig zu kaufen, aber die flexible Grundplatte zu Hause selbst im 3D Drucker herzustellen.

​Ich habe mich schon etwas mit einer Ki auseinandergesetzt und denke, dass man dafür wohl spezielles, flexibles Material wie TPU mit einer Shore Härte von circa 95A braucht. Mir ist auch bewusst, dass TPU sehr feuchtigkeitsempfindlich ist und man das Material während des Druckens in einer extra Trocknerbox halten muss, damit die Schicht Haftung stimmt.

​Da ich das ganze noch nicht ganz verstehe und bei einem schweren Pferd (ca. 900kg ) enorme Kräfte wirken, frage ich mich:

​Ist das für einen absoluten Einsteiger realistisch umzusetzen? Bekommt man als Anfänger die richtigen Einstellungen hin, damit der Druck stabil genug ist und unter Belastung nicht reißt? Gibt es das material auch in Signalfarben, damit man es schneller findet, wenn es abfällt (Pink 😁)?

​Welches Equipment reicht dafür aus? Reicht ein Direct Drive Drucker aus dem Einsteiger Bereich wie zum Beispiel ein Bambu Lab A1 mit Filament Trockner?

​Hat jemand von euch schon mal Hufschutz oder Einlagen gedruckt und Erfahrungen, wie sich das Material gegen Abrieb, Matsch und Scherkräfte hält?

​Was hält die Community davon, ist das privat gut umsetzbar oder unterschätze ich die Herausforderungen beim Material und der Sicherheit für das Pferd?

​Danke euch schon mal für eure Tipps und Rückmeldungen! 😍😍


r/3Dprinting • • 1h ago

Troubleshooting Clicking/ticking sound from my 3d printer

Enable HLS to view with audio, or disable this notification

• Upvotes

After my post about the rail my 3d printer broke. I did fix it but in the progress dismantled the head part. I test printed a benchy and it worked. But now when I’m printing more rails the gear on top of my printer part is making a ticking/ clicking sound. When I touched it I felt it twitching. This didn’t happen with the benchy. So far I have seen no problems with my print. Is this normal? If not what can I do to fix it. Another thing is that my heatblock looks slightly crooked. I use an ELEGOO Neptune 4 pro


r/3Dprinting • • 15h ago

Troubleshooting I made it!

Enable HLS to view with audio, or disable this notification

7 Upvotes

After so many comments in my old post it's only fair I give you guys an update.

No, it wasn't wet filament. Neither was a clog. Surprisingly, it also wasn't bed adhesion and yes, there were brims. Also, it wasn't a prime tower or some sort of timelapse tower. Its just my part :)

While I'm waiting for the new spools to arrive, I decided to finish up the spool I have doing some science test prints: that 240mm tower that seemed to fail first.

I tried enabling Z Hop (thanks u/FreeThotz !) and slowing the print down (thanks u/Proton_Energy_Pill !) and while they appeared to help a bit, it wasn't enough. I'd get some more good layers out of it, not nearly enough.

Like many have said, the hape was too wobbly: this comment by u/DocJeef had some interesting math in it that made me realize that making the "leg" part of those "L" a bit longer would probably add more than enough stability to print it successfully without changing any settings.

And that was it.

To complete the post I am adding a video of two (different) complete timelapses and a bonus video that shows exactly what was happening in high definition.

Here is the album: https://imgur.com/a/40tuLmU

Cheers and thanks!